Friday, 22 September 2017
Thursday, 21 September 2017
Wednesday, 20 September 2017
How to Perform a Vehicle Maintenance Service

Many people
automatically think anything that deals with their vehicle maintenance
needs to be dealt with by a professional. These instructions will prove
otherwise. Approximately every 3,000 to 5,000 miles a vehicle should be
serviced. To some people this just means changing the oil, but what a
vehicle really needs is an overall maintenance. Here are the general
steps that should be taken for a vehicle maintenance service.
Basic Services Performed:
1. Oil Change (Steps 3-6)
2. Tire Rotation (Steps 7-9)
3. Tire Pressure (Step10)
4. Check Fluid Levels (Step 11)
Basic Services Performed:
1. Oil Change (Steps 3-6)
2. Tire Rotation (Steps 7-9)
3. Tire Pressure (Step10)
4. Check Fluid Levels (Step 11)
Step 1: Purchase Oil and Filter

Photo courtesy of acdelco.com
Look in your vehicle's manual to determine what type of oil and how much to purchase. Purchase the oil at your local auto parts store. While there, you can also ask them what type of oil filter you need for your vehicle.
Look in your vehicle's manual to determine what type of oil and how much to purchase. Purchase the oil at your local auto parts store. While there, you can also ask them what type of oil filter you need for your vehicle.
Step 2: Identify Tools and Materials

Locate
all the tools and materials you'll need for the maintenance service and
have them handy so you don't have to search for them while working.
You'll need the following tools:
1. Car jack
2. Creeper
3. Basic wrench
4. Screw driver
5. Pressure gauge
6. Air nozzle
7. Filter wrench
8. Socket
9. Air impact wrench
10. Oil Filter
11. Oil
12. Rag
13. Oil pan (no pictured)
14. Funnel (optional)
1. Car jack
2. Creeper
3. Basic wrench
4. Screw driver
5. Pressure gauge
6. Air nozzle
7. Filter wrench
8. Socket
9. Air impact wrench
10. Oil Filter
11. Oil
12. Rag
13. Oil pan (no pictured)
14. Funnel (optional)
Step 3: Warm Up and Jack Up Vehicle

Materials Needed for Step: Car Jack
Start vehicle until engine temperature gauge rises about a quarter of the way. This will allow the oil to drain faster and to get a thick goop out that is bad for the engine.
Find a spot on the frame of the vehicle preferably to jack up the vehicle high enough for you to fit under it while on the creeper.
Step 4: Drain Old Oil

Materials Needed for Step: Creeper, Wrench, Rags, Oil pan
Locate the oil plug. (Manual will describe its location)
Place pan under the plug to catch oil.
Remove oil plug with properly sized wrench.
Once oil has stopped draining, wipe surface clean and put oil plug back in.
Tighten oil plug securely.
Locate the oil plug. (Manual will describe its location)
Place pan under the plug to catch oil.
Remove oil plug with properly sized wrench.
Once oil has stopped draining, wipe surface clean and put oil plug back in.
Tighten oil plug securely.
Step 5: Change Oil Filter

Materials Needed for Step: Oil Filter Wrench, New Oil Filter, Rags, Oil Pan, Oil
Locate the oil filter which is usually close to the oil plug. (Manual will describe its location)
Unscrew old oil filter using filter wrench and rags.
Place old oil filter in oil pan with old drained oil.
Locate the o-ring on the new oil filter and lubricate it with some of the new oil.
Screw the new oil filter on hand-tight.
Step 6: Add New Oil

Materials Needed for Step:Oil and Funnel (optional)
Locate and remove the engine oil cap.
Pour in the predetermined amount of oil.
Replace engine oil cap.
Start and run vehicle for a few seconds to allow new oil to circulate through the engine.
Check to ensure oil level is correct via the dipstick.
The Oil Change portion of the service is now completed!
Step 7: Remove Tires

Materials Needed for Step: Car Jack, Air Impact Wrench, Socket
If vehicle is not still jacked up, jack up vehicle on one side enough so that both side tires are off the ground.
Use air impact wrench and socket to remove all lug nuts from both tires.
Lift off both tires and set aside.
If vehicle is not still jacked up, jack up vehicle on one side enough so that both side tires are off the ground.
Use air impact wrench and socket to remove all lug nuts from both tires.
Lift off both tires and set aside.
Step 8: Check Breaks

Top Photo courtesy of off-roadweb.com
Materials Needed for Step: car jack
While the tires are off, look at break pad to make sure there is plenty of pad left.
Materials Needed for Step: car jack
While the tires are off, look at break pad to make sure there is plenty of pad left.
Step 9: Rotate Tires and Put Back On

Materials Needed for Step: car jack, air impact wrench, socket
Rotate tires. Move front tire to back and back tire to front.
Place tires back on lugs.
Screw lug nuts back on.
Let vehicle off car jack.
Repeat steps 7 through 9 on opposite side.
Rotate tires and Check Break part of service are now completed.
Rotate tires. Move front tire to back and back tire to front.
Place tires back on lugs.
Screw lug nuts back on.
Let vehicle off car jack.
Repeat steps 7 through 9 on opposite side.
Rotate tires and Check Break part of service are now completed.
Step 10: Check Tire Pressure

Materials Needed for Step: Tire pressure gauge, Air nozzle
Look on the tires to find the desired PSI the tires should be inflated to.
Use pressure gauge to check pressure in all four tires.
Use air nozzle to inflate if needed.
Look on the tires to find the desired PSI the tires should be inflated to.
Use pressure gauge to check pressure in all four tires.
Use air nozzle to inflate if needed.
Step 11: Check Fluid Levels
Materials Needed for Step:none
This is a good time to check your anti-freeze and whipper blade fluid levels.
Both levels can be check under the hood and each should be indicated by text to picture on their caps.
This is a good time to check your anti-freeze and whipper blade fluid levels.
Both levels can be check under the hood and each should be indicated by text to picture on their caps.
Step 12: Update Records
Materials Needed for Step: paper (optional), pen (optional)Some people just reset their mileage trip so they know when to perform their next maintenance service.
Another option is to record the service on paper. Things to include:
Current Mileage
Date
Services Performed
Pros and cons of doing your own car services
Car servicing can be expensive. One way to get
around it is doing your own services. Here are some pros and cons to
think about before popping the bonnet.
Average cost to service a car in Australia
Research conducted by Canstar Blue in 2015 has shown that when it comes to car servicing, you can expect to pay $380 on average every time you pull up at the mechanic’s workshop (an amount that can increase significantly depending on the type of car you drive). So what can you do if you don’t have $380 to shovel into your car every 6 months? Some Aussies have become “backyard mechanics” to save on costs – or simply because they enjoy it!Research from Roy Morgan shows 16% of Australians do all their own servicing, while 42% of Australians go to a qualified mechanic for their services, followed by 29% who take it to a dealer. Most of these backyard mechanics visit their local auto store regularly, with Supercheap Auto, Repco, and Autobarn being the most popular options. Supercheap Auto surveys show around 60% of their fans do their own servicing, while 40% prefer to visit a qualified mechanic.
There are a few things to consider before you pop the bonnet, though. Here are some of the pros and cons for servicing your car yourself.
Pros of self-service
It can be a lot cheaper
You can potentially save a lot of money on labour for a qualified mechanic by buying parts and tools yourself and going the DIY route. After all, your labour is free – as long as you have the time to put in.Probably for the cost reason alone, more than half of the drivers surveyed by Canstar Blue admitted they wait as long as possible before getting a service to save money. This was highest with drivers aged 25-39, with 61% trying to cut costs on their car.
It’s possible
Thanks to the internet, there are a bunch of regular service procedures that you can easily do yourself with literally no prior education about how your car works:- Check oil levels and change the oil if needed
- Check water levels and top up the water in the radiator and the wiper and washer fluid container
- Check and change air filters regularly
- Test battery levels and change the battery as needed
- Replace headlights (apart from that little light above the number plate, which is a bit harder to get to on my car)
- Replace worn out windscreen wipers
- Replace blown fuses
Cons of self-service
May invalidate your warranty
According to the ACCC law, a car warranty will remain valid if you follow the three main conditions:- Qualified staff: You can also have your car serviced by a non-dealer qualified mechanic during the warranty period. No need to service a car only with the dealer.
- Manufacturer’s specifications: You do need to get the services done at the recommended times in the logbook.
- Fit for the purpose: The parts used do not need to be genuine parts but must be the correct part for the job.
Extended car warranties are slightly different – they do require you to service your car at the manufacturer or dealer’s service centre, and this does not breach the ACCC law. So doing your own servicing during an extended car warranty will invalidate your warranty even if you are a qualified mechanic.
Check your car insurance policy first
Will your car still be insured if you are doing DIY services? Usually yes, you’ll be fine. However, if you’re doing some DIY modifications to the wheels, bodywork, or exhaust system, you may not be – so call your insurer before getting out the toolbox.Some repairs and maintenance need to be done properly
A trained mechanic will need to complete certain tasks anyway, even though you can do most things yourself. Things like major repairs are best done by a professional.There are also a stack of car parts that you should absolutely get serviced regularly and fixed as soon as they break, to prevent more expensive parts from carking it (like the engine).
It takes time
Servicing your own car takes a lot of time. It might even be cheaper and faster for you to buy the parts from your local auto store and have them install them for you. This is one option that doesn’t invalidate your warranty, because the installer will be a qualified mechanic.Most auto stores will usually install the following parts for you, usually for a small fee:
- Battery
- Audio system/sub woofers/head units
- Wiper blades
- Light globes in headlights or overhead cabin light
- Roof racks and storage pods
- Baby seats
- Aerial antennae
- Seat covers
Getting a new stereo system installed cost $75 (for a $300 stereo). This wasn’t a quick process, but it was certainly easier than doing it myself! My husband even sat in the passenger seat and helped “Captain Auto” install it, so that he can do it himself next time if needed.
How to Service a Car
How to Service a Car
Regular servicing of your car is important to keep the mechanics of your vehicle in good working order, to prolong it’s life and to keep it safe.It’s rather common place to miss out a service here and there simply to cut down on expenses. Servicing your car can be a costly affair, especially if you cover high mileage every year, so why not try it yourself?
By servicing your own car, you’re likely to save at least 2⁄3 of the price a garage would charge you. A basic car service is a relatively easy procedure. This guide explains how to service a car.
Car maintenance
Consult your cars manufacturers handbook if you have one as this should provide details on when to service your car. If the manufacturers guide is not available, generally a car should be serviced anywhere from 6,000 to 10,000 miles or once a year if under that mileage. Regular home car maintenance should include:- checking oil levels
- engine coolant levels
- hydraulic brake fluid levels
- windscreen washer refilling
- tyre pressures and tyre damage such as cuts and bulges. The tyre tread depth should be at least 1.6mm around the entire circumference of the centre 3⁄4 breadth of the tyre. Also check for safety markers. More information can be found in the Show Me Tell Me section.
- indicators, brake, rear and head lights
Car service checklist
In order to service your car, a car service checklist will need to be compiled. A servicing checklist can often be found in your cars service manual or documents. If this information isn’t available use the car service tool checklist below:- oil filter wrench/removal tool
- spark plug removal tool
- socket set or spanner for removing the sump plug for oil drainage
- screwdriver for unscrewing air filter case if applicable. Clips may be the case alternatively
- car jack and axle stands
- antifreeze tester
- oil catch pan
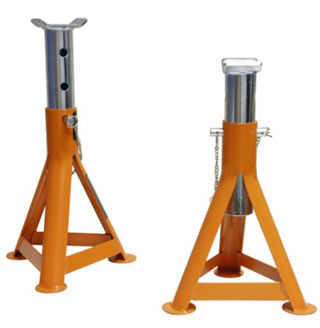
Axle stands
Car axle stands
Axle stands are cheap to purchase from hardware stores such as HalfordsCar service parts checklist:
- engine oil – consult your cars manufactures guide for the correct oil type
- oil filter – use a quality branded filter
- sump plug washer – use a new sump plug washer and not the old one
- spark plugs – again good quality branded plugs
- air filter
- antifreeze if applicable
Oil filter wrench
Oil filter wrench / removal tool
An oil filter wrench / removal tool can be purchased inexpensively in many vehicle hardware stores or easily from the internet. Wrenches are designed to fit all car filters.Engine oil change
Let’s start with the engine oil change. The engine oil needs to be warm before draining as warm oil will flow more freely than cold. Run the engine for 15 minutes or so before drainage. Ensure you perform the oil change on a level surface.Jack the car up and axle stands for safety. Remove the oil cap on the top side of the engine. Failure to do this may cause a vacuum when draining the oil, resulting in not all the oil being removed. Place the oil catch pan under the sump plug and drain. The engine oil may be hot so be careful.
Oil filter
Turn the oil filter wrench anti-clock wise to remove the filter. The filter may still have plenty of oil inside so be careful not to spill oil. Ensure the filter seat on the engine is clean and place a light coating of oil on the gasket of the new filter. Initially screw the oil filter back on and gently tighten with the oil filter wrench. Ensure not to over-tighten for risk of damaging screw thread.Engine oil change continued
The oil can take several minutes to fully drain. When the engine is fully drained, replace the sump plug using a new washer and refill the engine with oil. It is important to refill the engine with oil slowly making regular checks of the engine oil level indicator on the cars dipstick. The last thing you want to do is have to drain the oil again by over filling the engine. Once the oil level is a little below the maximum marker on the dipstick, replace the oil cap start and run your engine for around 10 minutes. Turn off the engine and check once again the oil level using the dipstick. Finally make a check for any leakages on the sump plug.How to dispose of engine oil
Disposing of engine oil onto the ground is highly toxic and can enter the water table. It is also illegal to dispose of oil in the garbage and down storm drains. Used engine oil needs to be disposed of responsibly by locating your nearest waste oil recycling bank.Engine coolant / antifreeze
An integral part of an engine is the cooling system. Around one third of the energy produced by car engines is wasted due to it being converted to heat. The correct mixture of engine coolant is essential to not only keeping an engine from freezing in the winter, but from overheating in the summer, and to prevent the corrosion of internal components. See what is engine coolant for a guide on exactly what coolant does, the various types, what type of coolant you should use when servicing your car and how to check engine coolant levels.Change spark plugs
Before removing the old spark plugs, ensure there is no debris around the chamber that may fall into the ignition chamber. Using a good quality brand with a copper core electrodes, insert the plugs until hand-tight. Continue to tighten the plugs with the spark plug removal tool for a further 1⁄4 to 1⁄2 turn of the tool ensuring that you don’t over-tighten as this may result in thread damage.Air filter
Fitting a new air filter is a simple process. The air filter housing may be secured by screws or simply clipped on. The new air filter simply needs to be dropped in.Antifreeze
Ensure the engine has cooled sufficiently before opening the cap on the coolant reservoir. Coolant tanks can be under pressure with boiling hot water contained. The colour of the liquid should be blue, green or pink depending on the antifreeze colour. Any other discolouration or oil in the coolant tank should be investigated by a specialist. An antifreeze tester is cheap and easy to use. It will contain instructions on how to use and to maintain the correct level of antifreeze.Additional maintenance checks
When changing the spark plugs, check the leads for any sign of deterioration. A good set of leads should last for well over 10 years. Timing and cam belts should be checked for signs of wear and tear. These belts don’t usually need changing with each service although renewing them regularly will decrease the risk of engine damage.Should I service my own car?
If your car still has the manufacturer’s warranty, the warranty is likely to state that you must have it serviced at their dealerships. Having it serviced by yourself or by another service provider may invalidate your warranty. It’s also worth remembering that if you like to keep a car with a service history, self servicing your car, a service history stamp will not be issued in your servicing book.What oil for my car
There are 3 main types of engine oil that can be used in your car.- Fully synthetic engine oil
- Semi synthetic engine oil
- Traditional mineral based engine oil
Fully synthetic engine oil is essentially artificially made. It’s purpose is to last longer than conventional oil before the components break down. This means that the oil life span will last longer between engine oil changes. Another advantage is that fully synthetic oils withstand higher and lower temperatures better than convention engine oils by retaining it’s original structure in extremes, therefore reducing engine wear. The disadvantage with fully synthetic engine oil is it is significantly more expensive than semi synthetic and traditional engine oils.
Semi synthetic engine oil is a combination of fully synthetic and traditional engine oil. Semi synthetic offer many of the advantages of fully synthetic but at a lower cost. Traditional engine oil in the original mineral based engine oil that has been refined.
Which engine oil should I use
As a general guide, a typical modern family car will run just fine on semi synthetic engine oil. High performance engines are better suited to fully synthetic engine oils.Car service cost
The cost of servicing your car can vary significantly. A basic car service will be significantly cheaper than a full serviceBasic car service
A basic car service may include but not limited to:- Engine oil change
- Air filter
- Oil filter
- Spark plug change
The above is a very basic service. Many garages are likely to include more in their basic service.
Full car service
A full car service may include but not limited to:- Engine oil change
- Transmission fluid
- Spark plug change
- Windscreen washer fluid
- Power steering fluid
- Fan belts
- Antifreeze
- Air filter
- Pollen filter
- PCV valve
- Windscreen wipers
- General lubrication
- Oil filter
- Battery check
- Brakes check
- Brake fluid check
- Tyre pressures / safety check
- Fuel filter
- Lights check
- Steering and suspension check
- Exhaust check
Service Your Car
Car Talk Do-It-Yourself Tips
Here's the most important advice we can give: Your goal isn't to fix your car.That's right.
Your first and most important goal is to walk away from your car at the end of the day with all digits, appendages and eyebrows intact.
Your second goal is to not blow up anything or anyone else.
Your third goal is to not break something that's not already broken.
Your fourth goal is to fix what's broken.
Here, then, is our advice for successfully achieving all four of the Car Talk Do-It-Yourself goals.
 1. Start simple.
Start with the easiest repairs first. Don't dive right into
rebuilding your transmission. You'll gain confidence, learn how to use
tools and begin to understand how everything fits together on your car.Here are some great repairs for novice shade tree mechanics, in order of increasing difficulty:
- Replace the wiper blades
- Change the air filter
- Change a headlight
- Change a battery
- Replace the spark plugs
- Change the oil
- Change belts
If you have to jack up your car to get underneath it, under no circumstances should you use the flimsy jack that came with the car. And never, ever get under your car unless it's supported by approved jack stands. (Unless, of course, you can get your mother-in-law to hold the car up. In which case, we'd like to see photos.)
Finally, when you're getting started, try to avoid repairs that involve contorting yourself into an uncomfortable position, which can make a repair vastly more difficult.
 2. Avoid repairs with dire consequences.
Try to avoid repairs or service work where the consequences of a
mishap are great. For example, don't try to replace your brake master
cylinder or fuel line on your first repair. You could end up crashing
into a plutonium tanker. Or be self-immolated. Or worse still, you might
wreck your engine.
 3. Get the tools you need.
Before you start ripping apart your car, go out and get a set of tools, including:- A complete set of socket wrenches, including swivel sockets with extensions of various lengths and angle accessories.
- A complete set of open-end and box wrenches.
- The usual screwdrivers, pliers — and especially, a good set of vise grips.
- Whatever special tools are necessary for the job you're contemplating. For example, a special tool is necessary to remove the oil filter, and another for the spark plugs. In both cases, there are different sizes of tools, so take a look first and find out what you'll need.
 4. Do a little homework.
Do some homework before you plunge into a repair. It just might save
you a migraine later. Buy the manufacturer's shop manual for your
vehicle, and read up on the repair. Check information online, such as
the Maintenance Advice in this section or other resources.Here's one true story of why it's important to do your homework:
When we first got involved in car repair, we once contemplated a job and took a quick look at the service manual. It had only six steps. We decided we'd go for it. So we went out and bought the parts. When we looked at the manual more closely, we noticed that the first step said "remove engine." No kidding.
So read the manual!
 5. See one before you do one.
The best way to learn is to work with someone who knows what he or
she is doing. If you're undertaking a repair you've never even seen done
before, it's reasonably likely that you'll screw it up — or, at best,
you'll do it the hard way. Our advice? Operate on the same principle
that medical schools use: see one, do one, teach one.
 6. Don't be ashamed to ask for help if you screw up.
It happens. You got your old serpentine belt off, the new one on ...
and your car runs backward. Don't be shy about calling your regular
mechanic. Our advice is to fess up immediately. Tell him you screwed up
your repair and need a question or two answered. If he's a nice guy,
he'll take pity on you and answer a question or two.Don't take advantage of your mechanic, however. Remember that he's probably extremely busy trying to pay off his new 24-foot cabin cruiser.
A final word of advice. If you really screw up and have to take your car to your mechanic, don't try to cover it up. Confess. We can tell immediately when a customer has tried to hide a repair gone awry. Everyone makes mistakes, strips bolts and blows parts up. It happens. It may take a few years, but eventually even you'll laugh about it.
 7. Safely dispose of the toxic crud that will come out of your car.
After you're done with your repair, it's possible you'll be left with
used coolant, motor oil, brake fluid or other toxic materials. You'll
need to dispose of them safely — and by that, we don't mean dumping it
on your neighbor's award-winning Malaysian petunias.If you ask nicely, your mechanic will likely accept your waste for a proper burial.
In many states, retailers are required to accept used motor oil, coolant and other fluids — as long as you have a receipt showing you bought an equal amount of the product at that business.
Finally, you can always dispose of toxic fluids at your local hazardous waste facility. To find out where to take waste in your town, check out Car Talk's Eco Area.
How To Service Your Car / Van Yourself At Home

Tools will make the job easier..

Hello, this is an easy to follow guide, which will give you some tips on how to service your own car or van at home.
Servicing your own car or van at home instead of getting it done at a garage has several benefits.
Firstly, you'll know that it has actually been serviced, rather than nothing at all being done to it, which is probably uncommon, but I have heard of it happening.
Secondly you'll know it has been done using decent quality components including decent oil etc.
Thirdly, if you do it yourself, you'll know it's been done right and won't have any nagging worries about whether the garage drained the oil properly etc.
Fourthly, it's a satisfying feeling doing it yourself and will make you feel like a real man (or woman!).
So with all that said, how do you service your own car or van? My friend needed their car servicing, so I decided to take some photos as I did it, so I could write this article. So follow the guide if you need a bit of advice. It's easy, just do the following and get the right kit before you start.
This is what you'll need to service your car!

The
first thing you're going to need to do is make sure you've got the
right tools. To perform a basic service, you're going to ideally need a
socket set, an oil drain tray, possibly screwdrivers and allen keys,
ramps. an old rag and a cup of tea. You'll also need an oil filter
remover and a sparkplug removal socket.
You can get a decent socket set without spending too much money and if you get a good one, you can keep it forever practically, so get a decent set. In the UK, you can get a good one (not the very best, but perfectly useable for home mechanics) for about £100 or so. You'll be able to use it for all your servicing forever, so it's worth it in my opinion!
The picture shows my setup just before servicing my friends car. All the essentials are on there.
To
perform a basic service, as well as tools, you'll need oil and oil
filter, sparkplugs and air filter. Most car parts shops will supply the
right ones if you give them your registration number as they can
identify the car from that.
If fully synthetic oil is recommended, then you might as well go for it in my opinion, the price difference between that and part synthetic is so small then you're not really saving anything worth saving.
If fully synthetic oil is recommended, then you might as well go for it in my opinion, the price difference between that and part synthetic is so small then you're not really saving anything worth saving.
This type of sump plug needs an Allen key to fasten it

The
first thing to do is to get the car warmed up. This will help the oil
to flow out of the engine a bit easier and makes the job a bit faster.
Several minutes idling or a quick drive round the block should do it.
You don't want the engine to burn you, so don't overdo it, but if the
sump is warm then that's fine.
After that, then you might need to get the car up on ramps. I always do this as it makes things a lot easier, getting underneath without ramps on most cars is difficult. There isn't much to it, just kick the ramps into place in front of the front wheels, then drive up them. As you get to the end of the ramp you'll hit the bumpstop. Just don't go flying over the end!
After this, then get some cardboard or similar under the car to stop any drips hitting the drive, get your oil drain tray underneath the car, then undo the sump plug. This is the bolt that's attached to the lowest part of the sump. They are usually either an Allen bolt, or a 14mm bolt, which you can undo with your socket wrench.
This is the sump plug on the car I serviced for this article

Here
is a nice action shot of the dirty brown oil draining into the oil
drain tray. It is a good idea to wear gloves while taking the sump plug
out, otherwise hot dirty engine oil goes all over you. Of course as well
as undoing the sump plug, you need to take off the oil filler cap from
the top of the engine and also undo the oil filter. You might as well
let the oil start draining out of the sump first though.
Oil draining into tray

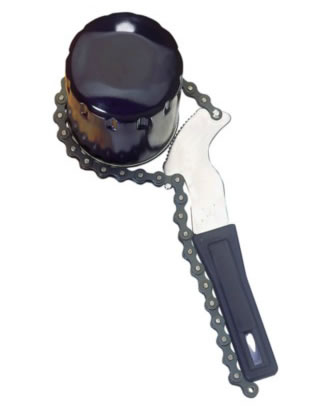
This is the sort of oil filter remover I use


There are different types of oil filter remover.
The one I use is the sort that has 3 arms, this automatically adjusts to the size of the filter and grabs it as you turn.
It's a sight easier to use than the chain type and also allows you to grab the filter if you don't have much room as you can use a socket set extender bar.
The chain or band type works a bit differently as you need a bit more room for it. I've had cars in the past that simply haven't had room for the other type of remover, which is why I now use this for everything.
Unfortunately I didn't have room to get the camera in to get a shot of the tool in action, but simply grab the oil filter with the tool and undo it in an anticlockwise direction.
It shouldn't take much force as they're usually not fastened on too tightly. Some oil will spill out so be ready for that.
The next step is to drink one of these

After this, it's time for a cup of tea.
Aaah. Ready for the next part? Hold on a minute.
Take another sip. Mmm. Ok. Let's go on.
Aaah. Ready for the next part? Hold on a minute.
Take another sip. Mmm. Ok. Let's go on.
You'll
need to remove the sparkplugs. Now to do this varies on different cars.
The car in this article has the sparkplug leads fastened to the plugs
with individual bolts. Some have a pack that attaches all of the plugs
in one go. Some have individual leads that aren't bolted.
It's usually very easy to see exactly what you have to do to remove the leads though. In the case of this car, it was just a case of undoing the small bolt that attached each lead to the head, then pulling the lead off the top of the sparkplug. As you can see, there is an airbox that covers three of the four leads this car has, so I needed to take that off. Not to worry, the air filter needed changing anyway, so that was taken off.
It's usually very easy to see exactly what you have to do to remove the leads though. In the case of this car, it was just a case of undoing the small bolt that attached each lead to the head, then pulling the lead off the top of the sparkplug. As you can see, there is an airbox that covers three of the four leads this car has, so I needed to take that off. Not to worry, the air filter needed changing anyway, so that was taken off.

Can you imagine trying to breath through this thing?

This is the view I had when removing the airbox and taking a good look at the filter inside.
It always amazes me just how much crap the air filter picks up, even if it's only been on the car for a few thousand miles.
The more muck there is on the filter, the harder the car is going to find it to suck in air for combustion so over time you lose power. Easily solved though!
Air filters are very easy to replace, just open the air box, which is usually done with clips that you can undo with your fingers, pull the old air filter out and replace with the new one.
Simple!
This shows how dirty the old one had got. Air can't be flowing through something like this properly.

After
removing the air box and filter on this car, then the sparkplugs were
easy to get to. I left the filter til after the plugs had been changed
as obviously I couldn't put the air box back on and still do the plugs.
This is the view after removing the sparkplug lead.
This is the view after removing the sparkplug lead.

Remove the sparkplugs. Easy enough, you just need to make sure you put the sparkplug removal tool firmly onto the sparkplug.
They have a rubber part on the end, which grips the sparkplug tightly. This is so you can lift sparkplug out of the engine, without it dropping back down off the end of the tool repeatedly, while you swear loudly.
They have a rubber part on the end, which grips the sparkplug tightly. This is so you can lift sparkplug out of the engine, without it dropping back down off the end of the tool repeatedly, while you swear loudly.

The
photo shows an old versus new sparkplug. It isn't too clear in the
photo, but the old one has a tip that is blackened, with a far larger
gap than the new plug. It was still working, but the new one should get
the engine running more sweetly.

Make
sure you put the sparkplug in centrally. If you crossthread it, this
will not be a good thing. I usually take off the extender bar from the
socket wrench and put the sparkplug in with my fingers at first to make
sure it goes in properly, before using the wrench to tighten it up.
Don't do it up too tight, there is no need. A little nip at the end is all I use, although technically you should use a torque wrench. I have never bothered personally, but if you are ham fisted, then get out the torque wrench!
Don't do it up too tight, there is no need. A little nip at the end is all I use, although technically you should use a torque wrench. I have never bothered personally, but if you are ham fisted, then get out the torque wrench!
A bit of oil on your finger rubbed round the rubber seal will do the trick

Once
you have the sparkplugs in, the leads back on and the air filter
changed, then it's time to fasten the oil filter back on and refill the
engine with oil. I always wait until the engine has stopped dripping oil
completely, which takes about an hour. Not strictly necessary, but you
might as well let all of the old gunk out.
This is one of the things that servicing your car at home gives you over a garage. You can leave the car for an hour, or overnight to drain if you really want. A garage will let the old out, then put the plug straight back on and refill it without letting it drain over time. You tend to find quite a lot more oil drips out, so taking more time makes sense to me.
Get the new filter, wet your finger with the new oil and run it round the rubber seal to give it a nice seal and enable you to tighten it properly. Now when you fit it, the usual advice is to fit it hand tight only. I have never been comfortable doing this, a little nip with the removal tool reversed so it is on firmly is what I'd recommend. You don't want the thing coming off, or not being sealed properly and leaking oil.
As an aside, I once knocked the oil filter off a van by accident by reversing off a kerb a little too fast. It was a very poorly designed engine in my opinion as the filter was at the very bottom and very easy to knock off, I didn't even know I'd done it. Until half a mile down the road when the engine seized.. After that I've always made sure my oil filter is on securely!
Anyway,
after you're happy the oil has drained out properly, then you can pour a
bit of new oil through the engine to flush it out a little. Not
necessary, but you might as well swill it through a little is what I
tend to think. A good glug of oil through, then the sump plug goes back
in.
After that, then push the car back off the ramps ( be ready on the brakes as you won't have power assisted brakes without the engine running so you'll have to push them harder than normal!) then you're ready to top up the engine with fresh oil.
Add a little at a time, while checking the dipstick after you've let the oil settle in to the engine. Fill to the top of the dipstick. It's worth checking the car manual to see how much oil it will take, so you know how much roughly you're going to need to pour in as you don't want to overfill the engine.
I have a friend who is utterly clueless about engines, cars and most things practical. He bought a car which broke down on the test drive, then filled it to the brim with oil to the point where he couldn't fit any more in the engine. Unsurprisingly the engine blew its guts out the next time he drove it. Don't do this.. :)
Have you ever serviced your own vehicle?
Ok
then, you've changed the oil, oil filter, sparkplugs and air filter.
You've just performed a basic service on your car. Something else that
you need to keep an eye on is the fuel filter, which is very easy to
replace and usually a matter of a couple of bolts and also draining and
refilling other fluids, such as brake fluid, steering fluid and engine
coolant.
Keep an eye on your service manual to see how frequently you need to do these things. I will be covering both at a later date, when I have a bit more light and time.
If you've just finished servicing your car, then I think you know what to do next..
Keep an eye on your service manual to see how frequently you need to do these things. I will be covering both at a later date, when I have a bit more light and time.
If you've just finished servicing your car, then I think you know what to do next..
That's right, another of these!
I hope this article helped, if you have any comments, then please leave them below.
If you want to read any of my other articles, then please click on my profile at the top right of the page and have a browse.
Thanks!
If you want to read any of my other articles, then please click on my profile at the top right of the page and have a browse.
Thanks!
Subscribe to:
Comments (Atom)